Just imagine, you spend weeks making slides, perfecting your pitch and getting everyone hyped up for your webinar but ended with an awkward “Uh… can everyone hear me?” followed by five minutes of technical chaos.
We’ve all been there and remember its 2026 your audience has no time for clunky starts or boring stuff. Today’s webinars are sleek, interactive and backed by serious data. They are not virtual meetings. They are conversion machines that will boost leads, sales and brand authority if done correctly.
So, this is where a Webinar Checklist comes in handy for strategic planning. It’s your playbook to picking the right webinar topic and crafting the perfect webinar agenda. It shows you how to select the right webinar platform, execute a killer webinar promotion and get the most out of your on-demand webinar recordings.
You can be a first-time host or a seasoned pro aiming for flawless execution. This guide will walk you through every step from 8 weeks before your event to the last thank-you email. Let’s dive in and make your next webinar great.
✨Pre-Webinar Checklist: How to Plan the Journey Before the Webinar (From 8 Weeks to 2 Weeks)
❇️ The Planning Phase (8 Weeks Before Your Webinar)
The first stage to building the foundation for your webinar, you cannot start recording until you know what you are going to do. This is where you get to decide everything from your webinar agenda to post-event analytics report.
➡️ Step 1: Choose a Relevant Topic for Your Session
As a host creating a well-thought topic is what attracts your audience, if it’s dull and boring no one would find it attractive. So, come up with a topic that actually solves a real problem to makes people curious. You can also see what people are searching for using tools like Google Trends or SEMrush to find that sweet spot.
? Bonus tip: Incorporate long-tail keywords so your webinar can double as an SEO asset when you reuse the recording.
Example: 7 webinar topics that will interest your audience or How can you increase your webinar attendance rate by 3X? or 3 Steps to drive engagement and leads using Webinars.
➡️ Step 2: Finalize Your Webinar Format
Not all webinars are the same and created equal. The right fit depends on your audience and key performance indicators:
- Live Webinars: Perfect for real-time interactions, Q&A sessions & audience participation.
- Simulive Webinars: Webinars that were pre-recorded but streamed live with real-time chat support.
- On-Demand Webinars: Ability to watch anytime and anywhere makes it great for long-term lead capture.
? Pro tip: If your goal is engagement, go live. If your goal is scalability, record it once and enjoy the ever-growing content.
➡️ Step 3: Select the Right Webinar Platform to Host
A webinar platform is like the engine under the hood that powers your sessions. It needs to be strong and reliable enough to handle your vision. Look for these when choosing a webinar platform:
- HD streaming with adaptive bitrate (HLS/DASH) for smooth playback.
- Interactive tools like polls, quizzes, Q&A and breakout rooms.
- Live webinar platform can be recorded for on-demand access.
- Integrations with CRM/marketing automation makes it easy to track your leads.
Such features are built right into platforms like Zoom, Demio or GUDSHO, just make sure to test them before the go-day.
➡️ Step 4: Schedule Your Webinar for the Right Time
Timing is what decides your webinar’s attendance rate. According to multiple webinar planning templates, the best days for webinars are midweek mornings (Tuesdays to Thursdays around 10-11 AM). Avoid Mondays for email overload and Fridays for weekend brains. If you have a global audience, also consider time zones based on the attendee’s local time.
? Extra tip: Make an .ics calendar file for your registrants so your webinar is booked in their calendars immediately and sends them a timely reminder.
❇️ The Fine-Tuning Phase (5 Weeks Before Your Webinar)
By now you have a planned structure to host a webinar. All you have to do is add a little personality to your webinar that makes it hard to avoid. This is where your planning becomes a real marketing magic.
➡️ Step 1: Develop a Marketing Plan Your Webinar
If your 8-week plan had been all about building your webinar, now it’s all about selling it. See how to plan your multi-channel webinar promotion:
- Email marketing: Draft segmented drip campaigns with catchy subject lines to attract your target audiences.
- Social media buzz: Create and publish carousel posts, teaser videos and LinkedIn events to develop a hype for your session.
- Paid ads: use ads to retarget your site visitors and e-mail non-openers to tweak their interests.
? Pro tip: Use A/B testing early on headlines and CTAs to see your best version win the majority of sign-ups.
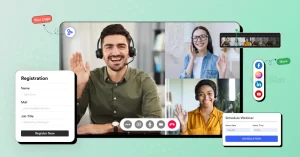
➡️ Step 2: Create a Webinar Registration/Landing Page
This is your webinar’s first conversion checkpoint. To make it click-worthy follow these steps:
- Always start with a value-driven headline (eg: “How to 3X Your Sales with AI in 60 Minutes”)
- Put your speaker’s bio with a headshot to create trust and make the audience sign up for people, not just topics.
- Use a mobile-friendly layout with above-the-fold registration forms as majority user prefer phones.
- Add Open Graph meta tags for better social sharing previews.
➡️ Step 3: Set up Email Campaigns
Email tends to tweak your viewers interest if your email automation feels like a friendly nudge and not a spam. So, create a sequence idea, subject line with a pain point or solution or real-time proven result based on your topic.
- Confirmation email: Send emails with instant one click .ics calendar links for convenience.
- Value teaser: Give your audience a quick insight or bonus downloads to get them warmed up for the session.
- Reminder emails: A consistent email pattern will help your audience to be aware of your webinar like 1 week, 24 hours and 1 hour before the event.
If your webinar platform can be integrated with HubSpot, ActiveCampaign or Mailchimp, you can easily auto-tag your registrants and send follow-ups for post-event engagement.
➡️ Step 4: Design Promotional Materials
Visuals are the once that make your audiences to stop scrolling. So, create images, videos and animations in many different formats to post on various platforms and reach wider users. Follow these three major formats:
- 16:9 Banner – Best for LinkedIn and YouTube.
- Square 1080×1080 – ideal for Instagram and Facebook posts.
- 9: 16 vertical format – Great for creating clips for reels, stories and shorts.
❇️ The Promotional Phase (3 Weeks Before Your Webinar)
Okay, your webinar is all set up and ready to get viewers. Now you need to send out invites and get people to show up. This is where we go from quiet prep to a loud strategic promotion.
➡️ Step 1: Start Promoting Your Webinar (& Boost It)
This is where you voice your webinars and crank up the volume to promote.
- Organic push: Share teaser clips, infographics or even a “behind the scenes” video of you prepping the session.
- Paid push: Set up targeted ads on LinkedIn, Facebook and Instagram for wider reach. Also, use lookalike audiences for your email list.
- Partnerships: Work with industry influencers or complementary brands to create trust and reach newer audiences.
? Pro Tip: Track your every promotion link with UTM parameters so you can analyze and find out which channel brings in the most registrations.
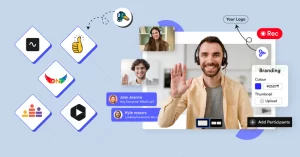
➡️ Step 2: Prepare Interactive Elements
When you host a static webinar, it is termed as a sleepy webinar as it lacks the two-way interaction with audience. Add interactive elements for your viewers to participate and boost engagement. Many webinar platforms now have built-in engagement analytics, so you can see exactly when attendees lean in or check out.
- Live polls: Polls are the easiest way to kickstart your engagement with a fun or thought-provoking question.
- Q&A sessions: Allocate specific time slots between your session for audience interaction and doubt clarification.
- Quizzes: Conduct quiz based on the webinar or some recent updates related to the topic for a more insightful approach.
➡️ Step 3: Rehearse Your Webinar
Before going live, rehearse yourself and the webinar platform multiple times to get the hang of the topic and maintain a good flow without any hiccups.
- Test audio, video and screen sharing options to ensure its error-free.
- Check your upload speed and try to get at least 10 Mbps for smooth playback.
- Time your presentation to ensure it fits your webinar agenda without rushing or dragging.
? Extra Tip: Record yourself running the webinar and watch it back to up the quirks you might have missed in the moment.
➡️ Step 4: Secure a Backup Plan
Technical problems can occur at the most unexpected time, so it’s good to have a backup rather than letting down your audiences.
- Always be ready to bring a spare laptop and microphone for any unforeseen issues.
- Save all your presentation slides in the cloud for quick and easy access.
- Keep a co-host on standby in case your connection drops.
- Have a dual-internet setup (Wi-Fi + mobile hotspot) for zero downtime.
❇️ The Final Phase (2 Weeks Before Your Webinar)
Two weeks have passed. Your promos are running, your sign-ups are coming in and now it’s time to tighten those bolts so nothing rattles on the big launch day. This is when you go from “promoting” to “perfecting”
➡️ Step 1: Automate Reminder Emails
You have worked hard to obtain those registrations and now make sure people attend the session.
- Schedule reminders at 1 week → 24 hours → 1 hour → 15 minutes before the live event.
- Keep the mail short with an immediate Join Webinar button.
- Add a calendar file, so the date is locked into their schedule.
? Quick Tech Tip: Make use of your webinar platform’s native reminder system and your email marketing tool to reduce no shows.
Step 2: Roles & Responsibilities
The host has to introduce the speakers and their roles before the live event starts. This creates a stable workflow and ensure that each responsible person does it correctly. A quick pre-event call with all the speakers gets you all on the same page about the webinar agenda and timing.
- Organizer/Host: Planning, communication, platform & speaker management to be taken care of.
- Speaker/Presenter: Takes care of the topic, content, presentation, slides and main flow.
- Moderator: Chat, Q&A engagement, content monitoring and flow management to be maintained.
- Tech Support: Ensures streaming quality, recordings, backups and troubleshooting
Step 3: Prepare Your Environment
A clean setup means fewer distractions for your audience.
- Avoid shadows in your session by using a 3-point Lighting setup (key, fill & back light).
- Use a USB condenser mic instant of the built-in one for podcast quality sound.
- A neutral and uncluttered background or a branded virtual background avoids audience distractions.
- Have a “Do Not Disturb” sign in outside the room for those walk-ins that might surprise you.
✨ Day-of-Webinar Checklist
The big day is here! Now that your preparation is 90% done everything should go smoothly. Let’s take look at the webinar preparation checklist to be followed on the day of the webinar.
- Test your tech twice like Audio, Video and Lighting. Test screen sharing, polls, chat and Q&A features on your webinar platform. A simple latency test will tell you if your stream lags when it really matters.
- Make sure your presentation deck is polished, branded and exported in the correct resolution (usually 16:9). Keep backups in the cloud and on a USB drive to overcome unexpected error.
- Warm up your audience early by opening the virtual room 10-15 minutes before start time. Play upbeat intro music, show a welcome slide and say hello to early attendees. This creates engagement before the official session starts.
- Practice your flow by doing a mental rehearsal of your intro, content transitions and closing remarks. This keeps you from being too dependent on notes and makes your delivery more natural than robotic.
- Keep backup plans ready, in case of an internet outage switch to mobile hotspot. Slide freeze? Keep a PDF backup. Mic issues? A spare headset always comes handy. Webinars are live events with lots of surprises.
✨ Post-Webinar Checklist: How to Wrap Things Up After a Webinar
Congrats! You crossed the finish line, but the race isn’t over yet. Post-webinar actions are all about nurturing your audience after the event, turning one-time viewers into followers and maybe paying customers as well. Here you get all the value from your work.
✅ Send Out the Recording (ASAP!)
Your attendees might want to re-watch your sessions and your absentees will appreciate the replay link. Use the cloud recording from your webinar platform or export it as MP4 for sharing via email.
?Tip: Put it on a secure video hosting platform with analytics so you know who hits play.
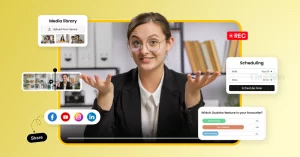
✅ Share Presentation Slides & Resources
If you promised handouts, slides or bonus links, you need to deliver’ them now. Send them in a neat, clickable format (PDF is best).
?Tip: Brand your download pages using file-sharing tools for visibility.
✅ Send a Thank-You Email
A thank you mail is polite, warm and it keeps your brand in their inbox for the right reasons. Personalize it with the attendee’s name, a quick recap and a replay link.
?Tip: Add a Call to Action for your next event, product or subscription.
✅ Collect Feedback
Listen to their thoughts. Give them a quick survey to let you know what worked, what didn’t and what they want to see next time.
?Bonus: Use NPS (Net Promoter Score) to measure satisfaction in a concrete way.
✅ Analyze the Data
Check attendance rates, engagement stats (poll responses, chat activity), and watch time in your webinar platform analytics. Why? All of these metrics help you fine tune content, timing and promotion for future webinars.
✅ Repurpose the Content
You can use your webinar for blog posts, short video clips, infographics or an email series.
Content recycling = maximum ROI.
Example: Break up a 60-minute session into 5 bite-sized clips for LinkedIn or Instagram.
✅ Keep the Conversation Going
Keep the buzz going! Post highlights on social media, answer questions from the first quarter and invite people to your community or next webinar.
Wrapping it Up
Hosting a webinar is more than a slideshow on a webinar platform. It’s a full-blown production from topic ideation to post-event follow-ups. Think of it as baking a cake: your pre-webinar planning is like mixing the ingredients, your live webinar day is like baking the cake, and your post-webinar strategy is like frosting and sprinkles.
Follow this webinar checklist as you’re not just running a webinar. You’re creating a digital experience to build your brand, generate webinar leads and convert more traffic to your landing page. So, fire up your creativity, double-check your tech and deliver a session that people will talk about long after the curtain closes.
Recommended Reading
![]() A results-driven Senior Digital Marketer with deep expertise in SaaS marketing, she is an expert in Buffer alternatives and optimizing social media workflows through social media management. She helps businesses choose the right tools to scale efficiently.
A results-driven Senior Digital Marketer with deep expertise in SaaS marketing, she is an expert in Buffer alternatives and optimizing social media workflows through social media management. She helps businesses choose the right tools to scale efficiently.